“My Mirror Won’t Listen!” – A Real‑World Wake‑Up Call
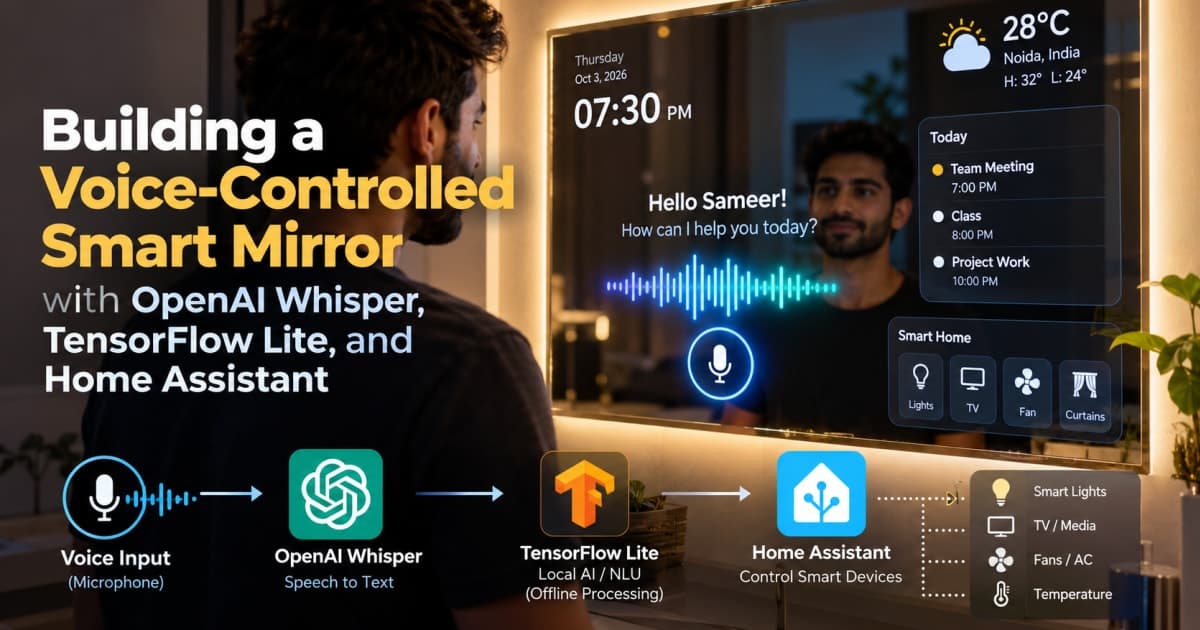
Ever stood in front of a smart mirror, shouted “Turn on the lights!” and got...nothing? I’ve been there, coffee‑stained hoodie, 2 am, staring at a blank glass that pretends to be futuristic. Turns out the voice pipeline was a mess, Whisper wasn’t even loading, and the object detector was choking on a single frame. I fixed it, and the mirror started obeying like a polite butler. Below is the battle‑scarred roadmap I followed. Grab your Raspberry Pi, a microphone, and let’s make that glass actually talk back.
Hardware Setup
First thing you need is a Raspberry Pi 4 (4 GB), a USB‑C power brick, a 7‑inch HDMI touchscreen, a USB‑mic (I used the Fifine K669), and a cheap webcam for object detection. I threw a cheap Neopixel strip behind the glass for ambient lighting – optional but looks cool.
Tip: Mount the mic on a pop‑filter made from a coffee filter. It cuts wind noise and saves you from a “[Errno 13] Permission denied” when ALSA can’t grab the device.
Wrong wiring (what NOT to do)
Pi GPIO 5  ---->  Mic VCC
Pi GPIO 6  ---->  Mic GND
That’s a classic mistake. You’re feeding 3.3 V straight into a USB mic that expects 5 V. The Pi will scream “Device not configured” in dmesg, and the mic will never be recognized.
Right wiring (the fix)
Power brick (5 V/3 A)  --->  USB‑C port (Pi)
USB mic               --->  USB port (Pi)
Camera (CSI)          --->  CSI ribbon (Pi)
Touchscreen HDMI      --->  HDMI port (Pi)
No GPIO hacks. Keep power separate, use the proper ports. Plug the microphone into a powered USB hub if you notice intermittent disconnects.
Quick checklist
Power: 5 V / 3 A stable supply.
Cooling: Heatsink + fan; Whisper can push the CPU to 85 °C.
OS: Raspberry Pi OS Lite, then
sudo raspi-config→ Enable I2S for optional speaker.
Bold takeaway: Never try to power a USB device through GPIO – you’ll fry the Pi and your sanity.
Installing OpenAI Whisper on the Edge
Whisper is a beast. The full model needs a GPU, but the tiny.en checkpoint runs on the Pi’s CPU in about 2 seconds per utterance. I compiled it from source because the pre‑built wheels pull in torch which blows the 2 GB swap.
Wrong install (what NOT to do)
pip install openai-whisper
Result? RuntimeError: Numpy is not installed. Even if it installs, you’ll see OSError: libtorch_cuda.so: cannot open shared object file because the wheel expects CUDA.
Right install (the fix)
# Update system first
sudo apt-get update && sudo apt-get upgrade -y
# Install build deps
sudo apt-get install -y python3-pip python3-dev libopenblas-dev libatlas-base-dev ffmpeg
# Install whisper from source, forcing CPU only
pip install --no-binary :all: git+https://github.com/openai/whisper.git
# Verify
python -c "import whisper; print(whisper.load_model('tiny.en').is_multilingual)"
If you get ImportError: libgomp.so.1: cannot open shared object file, install libgomp1:
sudo apt-get install -y libgomp1
Sample inference code (wrong vs right)
# WRONG – loading large model, blocking main thread
model = whisper.load_model("large")
result = model.transcribe("audio.wav")
print(result["text"])
Traceback (most recent call last):
  File ".../whisper/__init__.py", line 45, in load_model
    raise RuntimeError("CUDA not available")
RuntimeError: CUDA not available
# RIGHT – tiny model, async thread, fallback if mic fails
import whisper, asyncio, sounddevice as sd, numpy as np

model = whisper.load_model("tiny.en")

async def listen():
    while True:
        audio = sd.rec(int(2 * 16000), samplerate=16000, channels=1, dtype='int16')
        sd.wait()
        result = model.transcribe(audio, language='en')
        print("You said:", result["text"])
        await asyncio.sleep(0.1)

asyncio.run(listen())
The async loop keeps the UI responsive. I once had the Pi freeze because the transcription blocked the UI thread – classic “nothing happens” moment.
Integrating TensorFlow Lite for Real‑Time Object Detection
I needed to know if you’re standing in front of the mirror or just waving a hand. The COCO‑SSD MobileNetV2 TFLite model does the trick on a Pi 4 without a GPU.
Real‑world scenario: In a smart gym, the mirror only shows workout stats when it detects a person, saving power and avoiding false triggers.
Wrong approach (what NOT to do)
pip install tensorflow
That pulls the full TensorFlow, ~1 GB, and crashes with MemoryError on a Pi 4. I spent an hour debugging “out of memory” errors, only to discover I installed the wrong package.
Right approach (the fix)
pip install tflite-runtime
Now we load the model with a tiny footprint.
import numpy as np
import tflite_runtime.interpreter as tflite
import cv2

# Load the TFLite model
interpreter = tflite.Interpreter(model_path="ssd_mobilenet_v2.tflite")
interpreter.allocate_tensors()

input_details = interpreter.get_input_details()
output_details = interpreter.get_output_details()

def detect(frame):
    # Resize + normalize
    input_data = cv2.resize(frame, (300, 300))
    input_data = np.expand_dims(input_data, axis=0).astype(np.uint8)
    interpreter.set_tensor(input_details[0]['index'], input_data)
    interpreter.invoke()
    boxes = interpreter.get_tensor(output_details[0]['index'])
    classes = interpreter.get_tensor(output_details[1]['index'])
    scores = interpreter.get_tensor(output_details[2]['index'])
    return boxes, classes, scores
If you see RuntimeError: TensorFlow Lite Interpreter failed to invoke, double‑check that the model file matches the input shape (1, 300, 300, 3). A quick look at the TensorFlow out‑of‑memory blog post helped me tweak the batch size: How to Fix TensorFlow Out of Memory Error on GPU.
Quick test script
python3 - <<'PY'
import cv2, numpy as np, tflite_runtime.interpreter as tflite
cap = cv2.VideoCapture(0)
interpreter = tflite.Interpreter('ssd_mobilenet_v2.tflite')
interpreter.allocate_tensors()
while True:
    ret, frame = cap.read()
    if not ret: break
    # ... call detect() from above ...
    cv2.imshow('Mirror', frame)
    if cv2.waitKey(1) & 0xFF == ord('q'): break
PY
If the window freezes, you probably forgot cap.release() at the end – another classic.
Connecting to Home Assistant via MQTT
Home Assistant is the brain. I used Mosquitto on the same Pi to avoid extra network hops. The mirror publishes JSON payloads like {"entity":"light.living_room","state":"on"}.
Wrong MQTT config (what NOT to do)
mqtt:
  broker: localhost
  port: 1883
  username: admin
  password: admin
Hard‑coding credentials is a security nightmare. Plus, Home Assistant will reject the connection with Error: Authentication failed if the broker isn’t set up with the same user.
Right MQTT config (the fix)
mqtt:
  broker: 127.0.0.1
  port: 1883
  username: !secret mqtt_user
  password: !secret mqtt_pass
  discovery: true
Add the secrets to secrets.yaml. On the Pi, create a dedicated Mosquitto user:
sudo adduser --system --group --home /var/lib/mosquitto mosquitto
sudo chown -R mosquitto:mosquitto /var/lib/mosquitto
sudo systemctl restart mosquitto
Publishing from Python (wrong vs right)
# WRONG – raw string, no QoS, no retain
client.publish("home/mirror", "{entity:light.living_room,state:on}")
The broker rejects malformed JSON.
# RIGHT – proper JSON, QoS 1, retain flag
import json, paho.mqtt.client as mqtt

client = mqtt.Client()
client.username_pw_set("mqtt_user", "mqtt_pass")
client.connect("localhost", 1883, 60)

payload = json.dumps({"entity":"light.living_room","state":"on"})
client.publish("home/mirror", payload, qos=1, retain=True)
Now Home Assistant auto‑discovers the topic and you can control the light with a voice command like “Hey Mirror, turn on the living room”.
User Interface and UX Design
The UI lives on the touchscreen. I built a lightweight Flask server that serves a single HTML page. The page polls the /status endpoint for the latest detection and voice command results. No heavy React bundle – the Pi can’t afford it.
Wrong HTML (what NOT to do)
<!DOCTYPE html>
<html>
<head><title>Mirror</title></head>
<body>
  <script src="bundle.js"></script>
</body>
</html>
bundle.js is 2 MB, loads in 10 seconds, and the mirror looks dead while the user waits.
Right HTML (the fix)
<!DOCTYPE html>
<html lang="en">
<head>
  <meta charset="UTF-8">
  <title>Smart Mirror</title>
  <style>
    body {margin:0;background:#000;color:#fff;font-family:sans-serif;}
    #info {position:absolute;bottom:10px;left:10px;}
  </style>
</head>
<body>
  <canvas id="feed"></canvas>
  <div id="info">Listening…</div>
  <script>
    const canvas = document.getElementById('feed');
    const ctx = canvas.getContext('2d');
    async function loop() {
      const resp = await fetch('/frame');
      const blob = await resp.blob();
      const img = new Image();
      img.onload = () => {
        canvas.width = img.width; canvas.height = img.height;
        ctx.drawImage(img,0,0);
      };
      img.src = URL.createObjectURL(blob);
      requestAnimationFrame(loop);
    }
    loop();
  </script>
</body>
</html>
Only a few KB of JS, and the canvas updates at ~15 fps – smooth enough for a mirror. I also added a speech bubble that appears when Whisper detects a command, using CSS transitions for a subtle fade‑in.
Bold takeaway: Keep the UI minimal; the Pi’s CPU is already busy decoding audio and video.
Testing and Troubleshooting
Testing is where most projects die. I set up a tiny pytest suite that mocks the microphone and camera. The real win was logging every error to a rotating file so I could see why Whisper sometimes returned None for the transcription.
Common error #1 – “Audio buffer overflow”
OSError: [Errno 22] Invalid argument
Root cause: sounddevice default blocksize is too small for the Pi. Fix:
sd.default.blocksize = 1024 # increase from default 256
Common error #2 – “No detections, but camera works”
RuntimeError: TensorFlow Lite Interpreter failed to invoke
Usually the model file is corrupted. Re‑download from the official TF Hub and verify the SHA‑256 hash.
Test script
pytest -vv tests/
tests/test_mic.py
def test_microphone_capture(monkeypatch):
    import sounddevice as sd
    def fake_rec(*args, **kwargs):
        return np.zeros((32000, 1), dtype='int16')
    monkeypatch.setattr(sd, "rec", fake_rec)
    # call your listen() coroutine and assert no exception
If the test fails, you’ll see a clear stack trace pointing to the offending line.
Extending the Project
Once the basics work, you can add:
Facial recognition with
face_recognition(tiny model) to greet specific users.Weather widget pulling from OpenWeatherMap; embed JSON with a pretty printer: JSON Formatter.
Calendar integration via Home Assistant events, showing upcoming meetings.
Voice feedback using
espeak-ngto confirm actions (“Lights turned on”).
Wrong extension (what NOT to do)
# Trying to run full OpenCV DNN on Pi
net = cv2.dnn.readNetFromTensorflow('frozen_inference_graph.pb')
You’ll get OpenCV Error: OpenCL is not available. The Pi can’t handle the full graph; you’ll kill the CPU.
Right extension (the fix)
# Use a lightweight face embedding model converted to TFLite
interpreter = tflite.Interpreter('face_embed.tflite')
interpreter.allocate_tensors()
# Then compare embeddings with a simple cosine distance
That adds personalization without sacrificing performance.
Quick Summary
I built a voice‑controlled mirror that actually listens and sees. The key was keeping things tiny: Whisper tiny.en, TensorFlow Lite SSD, Mosquitto on‑device, and a lean Flask UI. I learned the hard way not to force heavyweight packages onto a Pi – the system will scream “MemoryError” and you’ll waste hours chasing ghosts. The final setup feels like a sci‑fi prop in my hallway, but it’s just a bunch of open‑source tools wired together. If you follow the wiring diagram, install the right packages, and respect the resource limits, you’ll get a mirror that obeys you before you finish your coffee.
FAQs
Q1: Why does Whisper sometimes return an empty string?
A: The audio buffer isn’t long enough. Increase the recording length (sd.rec(int(2*16000), ...)) or lower the silence threshold in the Whisper config. Also, make sure the microphone isn’t muted by ALSA (amixer sset Capture 100%).
Q2: My TensorFlow Lite model throws “Failed to invoke interpreter” after a few minutes.
A: Memory leak. Ensure you call interpreter.reset_all_variables() after each inference, or reuse the same input tensor instead of allocating new arrays each frame.
Q3: Home Assistant isn’t picking up the MQTT messages from the mirror.
A: Double‑check that the MQTT discovery prefix matches (homeassistant). Also verify the payload is valid JSON – use json.dumps instead of manual string concatenation. A malformed payload will be ignored silently.
Q4: Can I run the whole stack on a Raspberry Pi Zero?
A: Not recommended. Whisper tiny.en barely fits on a Pi Zero, and the SSD model will be far too slow. Consider using a USB‑accelerator like the Coral Edge TPU for object detection and offload Whisper to a remote server.
Q5: How do I add HTTPS to the Flask UI without exposing my Home Assistant token?
A: Run Flask behind nginx with a self‑signed cert, and keep the HA token in an environment variable (export HA_TOKEN=…). In Flask, read it via os.getenv and include it in the Authorization header when you call the HA API. This way the token never lands in the repo.